
23 June 2000
I got the piston ring compression tool today, so now the piston/rod
assembly that was put together yesterday can be put into the engine.
Everything was carefully cleaned (again) and the piston ring gaps
were arranged as per Total Seal's instructions. The cylinder bore
and entire piston were given a liberal coat of oil, the rod bolts
were covered with a short piece of rubber tubing to protect the
crank bearing journals from getting scratched, the bearings installed
in the rod and rod cap, and the assembly was lowered into the
block through the ring compression tool. Like this:
A deadblow hammer with a plastic face was used to move the
piston through the tool and into the bore:
I used the handle of the hammer to tap the piston far enough
into the bore for the rod bearing to contact the crankshaft:
Then the plastigage began again, just as with the crank bearings:
The bearings checked out okay, so the rod cap was installed,
torqued and the process repeated for the remaining 3 cylinders.
All the rods were assembled to the pistons facing the correct
way, and the pistons were all inserted into the bores facing the
correct way.
Now on to the auxillary shaft. The bearings for the shaft were
installed in part 1.1, so after a douse of oil, the shaft was
carefully slipped into the bore, making sure not to chink the
bearings with the shaft:
There is a groove visible in the last picture that the retaining
plate slips into and secures the shaft - it was next:
So, here we are: with the auxillary shaft seal installed,
the front main seal and belt guide installed, but no oil pan.
Hmmmmm.
with the auxillary shaft seal installed,
the front main seal and belt guide installed, but no oil pan.
Hmmmmm.
Time to put the windage tray on. Easy, slip it over the bolts,
screw on the nuts and check clearances carefully:![]()

I thought it might be nice to check the oil level, so I installed
a modified ford dipstick. The factory dipstick is about 3000 miles
long, so I cut 2999.99988 miles off of the dipstick tube and the
dipstick and inserted them into the hole in the block:
Now to install the oil pan - after checking to make sure that
the pickup is close to the bottom of the pan but not touching.
The oil pickup location was okay, but the pan contacted the windage
tray so it had to be modified for clearance:![]() (the old fashioned way)
(the old fashioned way)
So, now here we are: time for some pulleys - the cam pulley
and the accessory pully:
time for some pulleys - the cam pulley
and the accessory pully:
With pulleys installed:
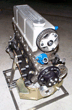
Now the water pump, the water neck (thermostat housing), and adapter plate are installed and the head is temporarily bolted to the block so it can get over to the frame builder for fitting into the frame. but first, I'd better put the engine in the cradle because with the head bolted on it will be too heavy for me to lift off the stand.
The engine as it is now:


More later!
aloha